
Understanding Professional Eyebrow Tinting
Eyebrow tinting is a semi-permanent coloring technique that enhances the natural shape, fullness, and definition of eyebrows. As a beauty technician, mastering this service allows you to offer clients defined brows without the daily application of makeup, creating both customer satisfaction and recurring business opportunities.
Professional tinting transforms sparse, light brows into defined arches that frame the face—think of it as makeup that stays on through swimming, workouts, and morning showers. The treatment creates a foundation that either eliminates the need for daily brow products or significantly reduces styling time.
Preparation: Setting the Foundation for Success
Client Consultation
Before beginning any tinting service, conduct a thorough consultation to:
- Discuss desired outcomes and shape
- Review contraindications (pregnancy, recent eye surgeries, skin conditions)
- Document client preferences and previous reactions
- Set realistic expectations based on natural brow structure
- Take before photos for your records
Consider using a brow mapping technique during consultation to visualize the final result. This approach helps align expectations and creates a blueprint for your application. For example, you might say: “Based on your face shape and natural brow arch, we’ll create definition here at the tail and subtly fill this sparser area near the front for a natural gradient effect.”
Patch Testing
Allergic reactions are a risk with tinting products. Always conduct a patch test 24-48 hours before the appointment by:
- Mixing a small amount of tint with developer
- Applying behind the ear or inner elbow, leaving it on as per instructed time on the box, then wiping it off.
- Checking for redness, irritation, or swelling after 24-48 hours
This precaution protects both your client and your business from adverse reactions. Document this process in your client records, noting the specific product used and any observations. While it may seem like an extra step that delays service, experienced technicians know that this small investment prevents potentially serious complications that could damage your reputation and business.
The Tinting Process
Materials Needed
- Professional-grade tint (such as Biosmetics eyebrow tint)
- Developer cream
- Mixing dish
- Brush for precise application
- Spoolie brush
- Petroleum jelly
- Cotton pads/swabs
- Timer
- Cleanser
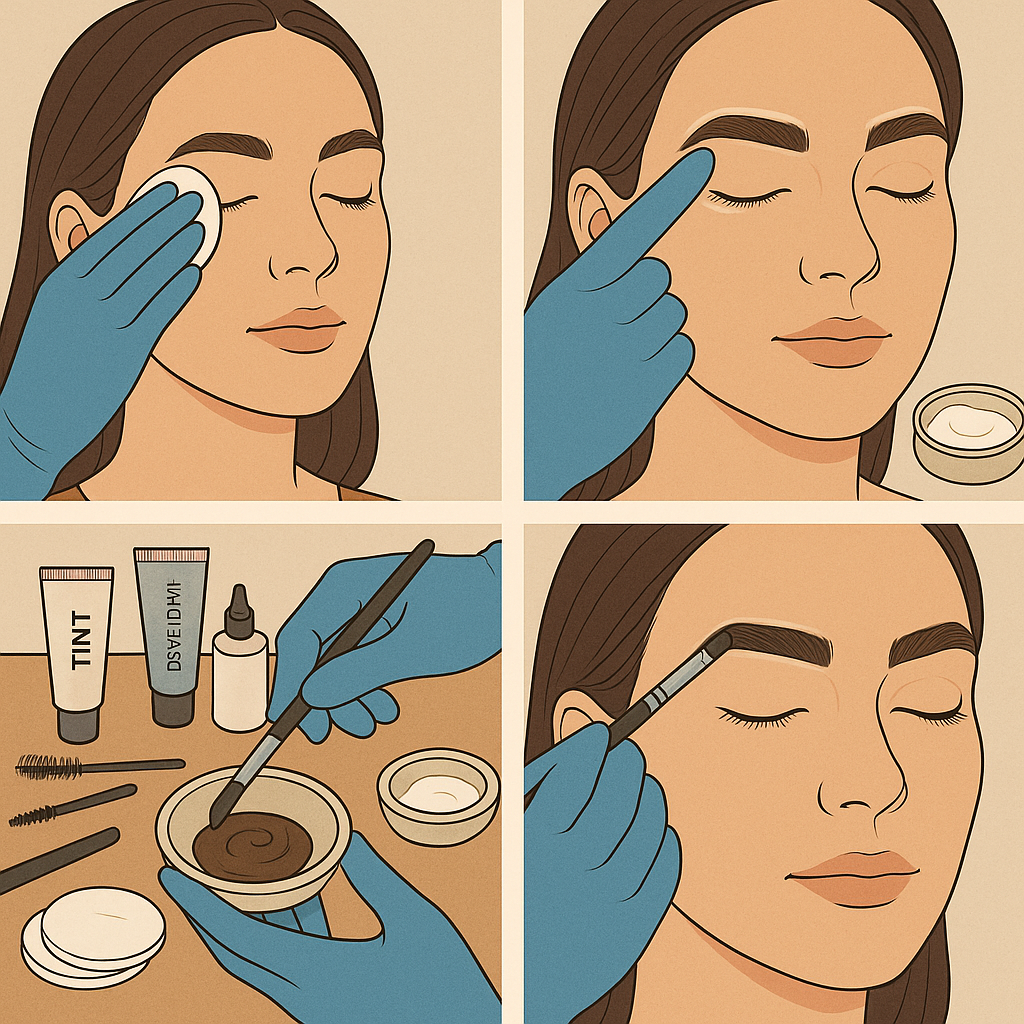
Step-by-Step Application
- Cleanse the brows thoroughly with an oil-free cleanser to remove makeup, oils, and skincare products that could interfere with tint absorption. Product residue creates a barrier between the tint and hair, resulting in patchy, uneven color.
- Apply petroleum jelly around the brow area (not on the brows themselves) to prevent skin staining. Create a protective barrier approximately 2mm beyond the desired brow shape to catch any errant tint without affecting your design.
- Mix the tint with developer according to product instructions. The ratio is approximately 1cm of tint to 5 drops of developer cream (check the instructions on the box as this can differ per brand). The mixture should have a smooth, creamy consistency that’s not too runny (which could drip) nor too thick (which could apply unevenly).
- Apply the tint with a brush, working methodically from the outer to the inner brow. Ensure complete coverage of all hairs, including fine, lighter hairs. For precision work around the tail, switch to a finer brush to create clean lines. A professional technique involves applying slightly more product to sparse areas where extra definition is needed.
- Process the tint for 5-15 minutes depending on:
- Desired intensity
- Client’s hair type and porosity
- Product specifications
Note: Fine hair typically processes faster than coarse hair. Establish a baseline timing for different hair types in your client notes—for example, 7 minutes for fine blonde hair versus 12 minutes for coarse dark hair when using the same tint.
- Remove the tint by gently wiping with damp cotton pads until all product is removed. Use a rolling motion rather than rubbing to prevent color from transferring to the skin.
- Assess the results and make any necessary adjustments. If you need to darken specific areas, you can reapply tint precisely where needed.
Color Selection Expertise
Choosing the right tint color is crucial for natural-looking results that enhance your client’s features.
Factors to Consider
- Skin undertone: Match warm or cool undertones (ash tones for cool skin, golden for warm skin)
- Natural hair color: Generally, select a shade that matches or is 1-2 shades darker than the client’s darkest natural hair
- Desired intensity: Consider whether the client wants subtle definition or bold contrast
- Age appropriateness: Softer shades often work better for mature clients
Many technicians find that maintaining a shade chart with real-world examples helps clients visualize outcomes. For instance, a client with light blonde hair might benefit from seeing how a light brown tint creates definition without looking harsh, while someone with black hair might need to see how a blue-black tint can appear more dimensional than pure black.
Color Mixing Techniques
For customized results, consider:
- Mixing two shades to create the perfect match (e.g., combining brown and black tints for a deep brunette with dimension)
- Adjusting processing time to control intensity (check progress at 5-minute intervals)
- Using different shades for different parts of the brow (slightly darker at the arch for dimension)
The Biosmetics deep black tint provides intense color for clients with black hair or those wanting dramatic results, while the natural shade works beautifully for lighter-haired clients.
Professional colorists often develop signature formulas for different client types. For example, you might discover that a 2:1 ratio of brown to black creates the perfect ash-brown for clients with cool undertones, while adding a tiny amount of auburn tint to brown can enhance the natural coloring for warm-toned redheads.
Tinting in Relation to Other Brow Services
Brow Tinting with Lamination
When combining tinting with brow lamination, sequence matters. Most experts recommend tinting after the brow lamination process to ensure even color distribution and to enhance the newly shaped brows. The lamination process opens the hair cuticle, which can affect how the hair absorbs tint—typically making it more receptive to color.
However, when using products that contain hydrogen peroxide—such as Step 2 of the brow lamination or lash lift process—tinting during lamination can be an efficient, time-saving option, as the tint can be mixed directly into the fixing lotion.
Always follow the specific instructions for your product system. When explaining this process to clients, you might use the analogy of coloring hair: just as color takes better to freshly treated hair, tint adheres more effectively to laminated brows.
Tinting vs. Other Brow Services
When discussing options with clients, be prepared to explain the differences between:
- Tinting vs. Microblading: Tinting enhances existing hairs and lasts 2-4 weeks; microblading creates hair-like strokes that last 1-3 years and involves breaking the skin with tiny needles to deposit pigment
- Tinting vs. Brow Lamination: Tinting adds color; lamination restructures and sets brow direction by breaking and reforming the bonds in the hair
-
Tinting vs. Henna: Professional brow tint typically lasts 2–4 weeks on the hair only, providing a natural enhancement. Henna, on the other hand, stains both the hair and the skin beneath, offering a bolder effect that can last 3–6 weeks, depending on skin type and aftercare.
However, it’s important to note that henna should never be used in combination with brow lamination. Brow lamination involves the use of chemical solutions to restructure and relax brow hairs, while henna is a natural dye that contains plant-based compounds—often including metallic salts or other additives. These can react negatively with the lamination products, potentially causing hair breakage, discoloration, or irritation.
For clients who want both lamination and color, it’s best to use regular tint formulated specifically for use after lamination treatments.
Providing this context helps clients choose services that align with their maintenance preferences and aesthetic goals. For instance, a busy professional might prefer the longer-lasting effects of microblading, while someone exploring brow enhancement for the first time might appreciate the temporary nature of tinting.
Longevity and Aftercare
Expected Duration
Professional eyebrow tinting typically lasts 2-4 weeks depending on:
- Product quality
- Client’s skin type
- Hair growth cycle
- Aftercare routine
- Exposure to sun, chlorine, and skincare products
In practice, clients with dry skin often maintain color longer than those with oily skin, as excess sebum can break down the tint more quickly. Similarly, those who swim frequently or use chemical exfoliants near their brows may experience faster fading.
Aftercare Instructions for Clients
Provide these clear aftercare instructions to maximize tint longevity:
- Avoid water and excessive moisture for 24 hours post-treatment
- Skip oil-based makeup removers and cleansers around the brow area
- Limit exfoliation near the brows
- Apply sunscreen when outdoors to prevent fading
- Schedule touch-ups every 3-4 weeks for maintenance
Consider creating a take-home card with these instructions and product recommendations. For example: “Use gentle micellar water instead of oil-based makeup removers, and consider applying your facial serums and exfoliants with careful precision to avoid the brow area.”
Troubleshooting Common Issues
Color Too Dark
If the tint appears too dark immediately after application:
- Reassure clients that color typically softens within 24-48 hours as excess tint washes away
- Use a gentle cleanser to slightly fade if necessary (demonstrating this technique on just one brow first can help clients see the difference)
- Record the timing and shade for future reference to adjust accordingly
One salon owner shares this anecdote: “A first-time client once panicked at her initially dark brows. I showed her photos of previous clients’ brows on day one versus day three, which immediately reassured her. By her follow-up appointment, she was delighted with how the color had settled into a natural shade.”
Uneven Application
To correct or prevent uneven color:
- Use precision mapping techniques before application
- Apply tint methodically in sections
- Keep detailed notes on processing times
- Use cotton swabs for clean-up during application
When correcting uneven application, consider using a micro-applicator to target specific hairs rather than attempting to reapply over the entire brow, which could result in overtreated areas.
Premature Fading
If clients report quick fading:
- Review their aftercare routine
- Consider longer processing time at next appointment
- Try a different tint formula with better staying power
- Recommend gentle cleansers specifically for tinted brows
According to a 2023 study on semi-permanent cosmetic procedures, oil-based skincare is the leading cause of premature tint fading, followed by sun exposure and chlorinated water.
Professional Products and Quality
Using professional-grade products ensures consistent, reliable results. Professional tints offer:
- Better color payoff
- Longer-lasting results
- More precise shade matching
- Reduced risk of irritation compared to DIY options
The difference between professional and consumer-grade products is particularly noticeable in challenging cases—for instance, when tinting resistant gray brows or working with clients who have previously used henna, which can create barriers to even tint absorption.
Client Management and Business Growth
Setting Expectations
Be transparent with clients about:
- The temporary nature of tinting
- Realistic outcomes based on their natural brow structure
- Maintenance requirements
- Potential for slight color variations between sessions
Using digital tools to document each client’s treatment can enhance this communication. For example, taking standardized before-and-after photos in consistent lighting helps demonstrate the service’s value and track changes over time.
Building Loyalty
Create a tinting program that encourages regular visits:
- Offer package deals for monthly maintenance
- Document each client’s formula for consistency
- Send timely reminders for touch-up appointments
- Educate clients on the benefits of professional maintenance
Successful brow artists often implement a “brow diary” approach, where clients receive a personalized record of their treatment details, including before-and-after photos, specific formulas used, and their next recommended appointment date. This tangible reminder of your expertise encourages booking consistency.
Conclusion
Mastering eyebrow tinting techniques allows you to provide a valuable service that enhances your clients’ natural beauty with minimal maintenance. By understanding color theory, perfecting your application technique, and providing excellent aftercare guidance, you’ll build a loyal clientele who trust your expertise for consistently beautiful brows.
Remember that continuous education on new products and techniques is essential for staying current in this evolving field. Consider complementary services like brow lamination to expand your service menu and meet diverse client needs. The most successful technicians view each brow as a unique canvas requiring personalized artistry—this attention to detail is what transforms a basic service into an experience clients will return for again and again.