
Curious about how to perform a lash lift yourself? Whether you are a beauty enthusiast wanting to enhance your lashes or a professional looking to offer this service to your clients, this complete guide has you covered. Achieving beautifully lifted and curled lashes involves a methodical process that ensures both effectiveness and safety. Let’s dive into the step-by-step instructions needed to achieve this desired look. There are 2 different ways to do lash lift – traditional way where glue is used to adhere lashes on the silicone shield or using the glueless Asian lash lift method. In this article we will concentrate on the traditional method.
What is a Lash Lift?
A lash lift is a semi-permanent treatment that curls and lifts your natural lashes from the base to the tip. This procedure opens up the eyes, giving the appearance of longer and more voluminous lashes without needing extensions. Unlike eyelash extensions, which attach synthetic lashes to your natural ones, a lash lift simply enhances the natural lashes you already have. This makes it a preferable option for those looking for a maintenance-free lash enhancement that still offers significant visual impact. For instance, with a lash lift, your lashes remain their natural length but appear more prominent and curled, akin to the effect of using an eyelash curler and a good mascara but with results that last much longer.
Key Benefits:
- Enhances the natural lashes: By lifting the lashes from the root, the eyes are naturally opened and given a more awake look, which can be especially transformative for those with straight or downward-facing lashes.
- Requires low maintenance: Compared to lash extensions that need regular touch-ups, a lash lift lasts without much upkeep. Once done, you simply follow the initial aftercare steps, and you can enjoy lifted lashes for weeks.
- Lasts up to 6-8 weeks: The longevity of a lash lift is a significant advantage. Given that the treatment works with the natural lash growth cycle, you don’t have to worry about frequent salon visits.
Essential Tools and Materials
Before starting, gather all the necessary tools and materials:
- Silicone Shields (various sizes): These are curved forms that the lashes are adhered to during the perming process. The size of the shield you select will determine the degree of the curl.
- Lash Lift Glue: This adhesive keeps the silicone shields and the lashes in place throughout the treatment.
- Lash Lift Lotions (perming solution, setting lotion, lamination lotion): The perming solution softens the lash and allows it to take on the shape of the shield, while the setting lotion hardens it in the new, lifted position. Lamination lotion deep-nourishes lashes at the end of the treatment.
- Lash Separating Tool: This tool ensures that each lash is individually lifted and properly adhered to the shield, preventing clumping.
- Under Eye Pads: These protect the lower lashes and delicate skin around the eyes.
- Brushes: These are used to apply the perming and setting solutions precisely.
For a precise application, it’s crucial to have the right tools. Visit our comprehensive guide on How to Apply Lash Lift Shields for detailed information on lash lift shield application.
Step-by-Step Instructions for a Lash Lift
Step 1: Prepare the Eye Area
Clean the eye area to remove any makeup, oils, and debris using an oil-free makeup remover. This will ensure the lotions can penetrate the lashes effectively. Proper cleaning is essential because any residual oil or makeup can create a barrier that inhibits the perming solution from working correctly. For example, even a small amount of leftover mascara can prevent the lashes from adhering properly to the shield and absorbing the perming solution evenly.
Step 2: Apply Under Eye Pads
Apply under-eye pads to protect the lower lashes and ensure they are not lifted during the process. Make sure they are securely attached but comfortable for the client. The placement of these pads is crucial because any slipping can cause discomfort or suboptimal results. For instance, if the pads move during the process, they might tug on the lower lashes or even get entangled with the upper lashes, complicating the procedure.
Step 3: Choose the Right Shield Size
Selecting the correct shield size is crucial for optimal results:
- Small Shields: Suitable for short lashes for a more dramatic curl. These create a noticeable lift, making shorter lashes appear longer and fuller.
- Medium Shields: Ideal for medium-length lashes. These offer a balanced lift that adds volume without being overly dramatic.
- Large Shields: Best for long lashes for a gentle lift. Larger shields are recommended for those with naturally long lashes who desire a more natural lift rather than a pronounced curl.
Read our Lash Lift Shield Size Guide for detailed tips on choosing the right size for your specific needs.
Step 4: Attach the Shields
- Apply a thin layer of lash lift glue to the back of the silicone shield or use self-adhering shields.
- Position the shield as close to the lash line as possible without pinching the skin. Proper positioning is key to ensuring that the lift looks natural and is comfortable for the client.
- Secure it in place and ensure it adheres properly. Tightly adhering shields guarantee that the lashes follow the shield’s contour correctly, resulting in a uniform lift.
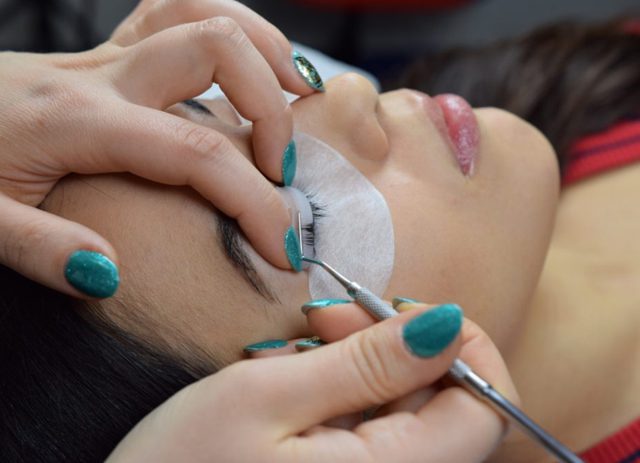
Step 5: Apply Lash Lift Glue and Separate Lashes
- Apply a thin layer of lash lift glue to the front of the shield where the lashes will attach.
- Use the lash separating tool to lift and adhere sections of lashes on the shield, ensuring that each lash is well separated and fanned out. This step is important as it prevents lashes from clumping together, allowing each lash to be lifted uniformly. For instance, if lashes stick together, it can create an uneven look, with some sections appearing more lifted than others.
Step 6: Apply Perming Solution
- Using a brush, apply the perming solution to the lashes. The precision of the brush ensures that each lash is coated uniformly.
- Process according to the product instructions, generally between 8-12 minutes depending on the hair thickness. Thicker lashes may require a bit more time, but it’s essential not to exceed the recommended duration to avoid over-processing.
Step 7: Remove and Apply Setting Lotion
- Remove the perming solution carefully with a clean cotton swab. It is crucial to ensure that all of the perming solution is removed to prepare the lashes for the setting lotion.
- Apply the setting lotion for the same amount of time. The setting lotion solidifies the shape achieved by the perming solution, “locking” the lashes into their new lifted position.
Step 8: Tint the eyelashes (optional)
Step 9: Remove Shields and Clean Lashes
- Gently remove the shields starting from the outer corner of the eye. Being gentle is key to avoiding damage to the newly lifted lashes or the delicate skin around the eyes.
- Clean off any residue with a cotton swab dipped in an oil-free remover. Removing any residual products ensures that nothing interferes with the final look and the health of the lashes.
For detailed aftercare, check out our How to Clean Lash Lift Shields for maintaining the tools for your next use.
Step 10: Apply Nourishing Lamination Cream
- Remove the tint carefully with a wet cotton swab or cotton pad. Apply lamination cream on the eyelashes with a clean brush. Leave the cream on for 5-10 minutes, then remove with a dry cotton swab/cotton pad. This will nourish and strengthen the eyelashes. Lamination process after the lash lift closes the cuticles and seals moisture into the eyelashes. As a result, they will look darker, longer and fuller.
Is a Lash Lift Painful?
A properly performed lash lift is not painful. Some clients may experience a slight tingling sensation from the perming solution, but it should never be painful. Any discomfort is minimal and temporary, typically lasting only during the application of the solutions. For example, if a client feels a burning sensation, it indicates that the solution might have come into contact with the skin or eyes, which should be rectified immediately.
How to Maintain Your Lash Lift
- Avoid water, steam, and eye makeup for the first 24 hours. During this period, the lashes are still setting, and moisture or makeup can interfere with the newly formed curl.
- Use a lash serum to nourish and strengthen your lashes. Lash serums can help maintain the health of your natural lashes, making future lifts more effective and your lashes look their best.
For after care products, explore Lash Lift Aftercare.
Final Thoughts
Performing a lash lift can be a straightforward and rewarding process if done correctly. By following these steps and expert tips, you will achieve gorgeous, lifted lashes that last. Education and practice are key; understanding each step thoroughly can make a significant difference in the results. Whether you are doing a lash lift on yourself or a client, patience, and attention to detail will yield the best outcome.
Remember, the health and beauty of your lashes are paramount. Take your time, follow the instructions carefully, and enjoy the beautiful results! For more comprehensive guides on beauty treatments, visit our blog and keep learning.